コメントは、訪問者があなたの投稿やページにフィードバックを追加したり返信したりするための方法です。
目次
設定にて
今後の投稿に対するコメントの有効/無効は、マイサイト→設定のディスカッション設定にて行うことができます。
「記事のデフォルト設定」で、「新しい記事へのコメントの投稿を許可する」オプションのオン/オフを切り替えます。

投稿またはページで
すでに公開した投稿に対してコメントを有効/無効にするには、投稿のディスカッション オプションに移動します。
- [My Site(s) → Posts or Pages] でコメントを有効にしたい(または無効にする)投稿またはページを選択します。
- 設定サイドバーで、ディスカッション タブを見つけ開きます。
- コメントを有効にするには [コメントを許可] を選択し、コメントを無効にするにはオプションを選択解除します。
ページでは、コメントはデフォルトで無効になっていますが、同じ場所で新しいページを公開するか既存のページを編集すると、コメントを有効にできます。
投稿やページのグループ
投稿やページのグループに対してコメントを有効/無効にしたい場合は、WP Admin → Posts または WP Admin → Pages で一括編集の指示に従ってください。
目次
コメントできる人
登録した WordPress.com ユーザーだけにコメントを許可するか、誰でもコメントできるようにするかは、あなた次第です。
読者は、Facebook や Twitter のアカウントを使ってコメントを投稿することもできます。
これらのオプションは、管理 → 設定 → ディスカッション ページの「その他のコメント設定」で利用できます:
- Comment author must fill out name and e-mail
名前とメールアドレスのフィールドを必須フィールドに設定します。 これらのフィールドは WordPress.com にログインしていない人にのみ表示されます。 - Users must be registered and logged in to comment
ログインしている人からのコメントのみを許可する場合は、このオプションを使用します。 これには WordPress.com ユーザー、およびすべてのソーシャル ネットワーク アカウントが含まれます (任意の情報を入力されるのを防ぎます)。
コメントを自動的に承認するか、ブログで公開する前に確認する必要があるかどうかを制御する設定もあります。
目次
コメントを投稿するには、個々の投稿ページにアクセスします (ブログのトップページにはコメントを残せません。特定の投稿にのみコメントを残します。)
個々の投稿ページを見つけるには、投稿タイトルをクリックします。 すると、個別の投稿が表示されます。 記事の一番下までスクロールしてください。 ブロガーがコメントを有効にしている限り、コメントを残すことができます。
目次
コメントの管理
ブログ所有者は、自分のブログに残されたコメントを完全に管理する立場にあります。
自分のサイトのコメントを見たり管理したりするには、WordPress にログインしてください。com にログインし、マイサイト → コメント:

There is several ways to view and sort your comments.コメント欄の表示と並び替えにはいくつかの方法があります。 Use the tabs for pending, approved, spam, and trashed comments to filter them:

Each list will show you previews of the comments to make it easy to scan them quickly. Pending comments — comments that have been submitted, but don’t currently appear on your site — are highlighted in yellow, to make them easy to spot:


Clicking anywhere on a preview will expand it to display the full comment.
If your site has lots of comments, the list will be split into pages. You’ll find links to move between pages at the bottom of the list.

Elements of a Comment
Here’s an illustration of an expanded comment, followed by an explanation of its parts from top to bottom.
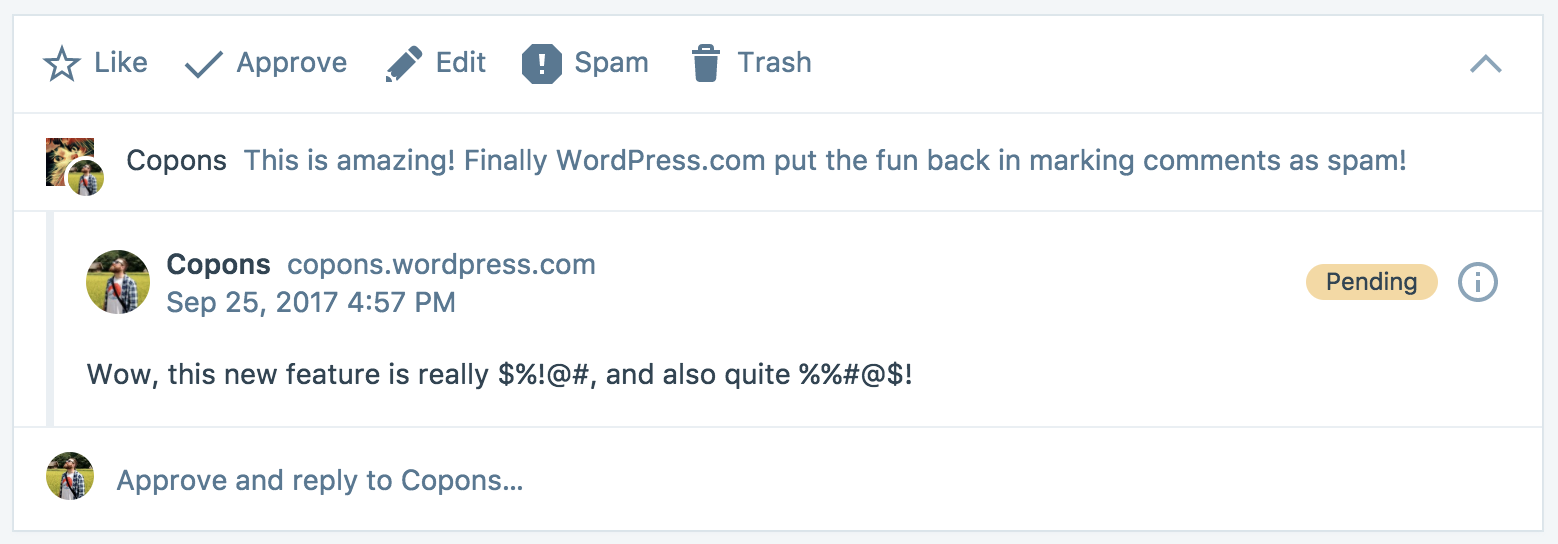
- Comment actions: Like, Approve, Edit, Spam, Trash.
- Collapse comment details button: the little arrow in the upper right will close the comment back down to the preview.
- A link: a link to the blog post or, if the comment is a reply to another comment, an excerpt of the original comment, so you have context for the conversation.
- Comment author’s name and website.
- Date and time the comment was left.
- The pending label, if the comment is waiting to be approved.
- Additional user information button (see below for detail).
- The comment text itself.
- The reply option.
Additional User Information
Clicking on the user info button will open a new section containing additional information about the comment author.
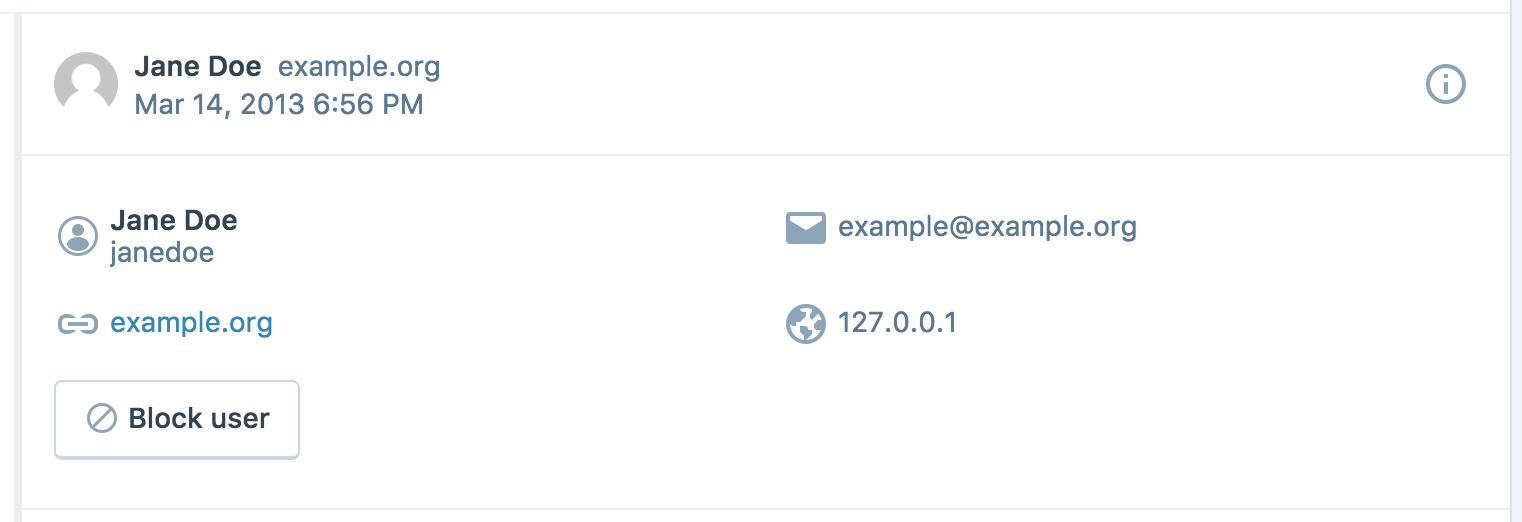
The Block User button will add the comment author to the site blacklist, blocking them from writing new comments on the site.
Comment Actions
You’ll find all the actions you can take on a comment at the top of the expanded comment. Use these buttons to like/unlike, approve/unapprove, edit, mark as spam, move to trash, or permanently delete comments. (Clicking Like or Approve once will perform those actions; clicking a second time will un-do the action.)

These actions are contextual and change depending on the comment status:
- Pending comments: Like, Approve, Edit, Mark as Spam, Move to Trash
- Approved comments: Like, Unapprove, Edit, Mark as Spam, Move to Trash
- Spam comments: Approve, Delete Permanently
- Trash comments: Approve, Mark as Spam, Delete Permanently
Editing a Comment
This is a view of a comment from the Edit screen at My Site→ Comments. The Edit screen will let you edit the comment in place on the Comments page:

Bulk Edit Mode
Click on the Bulk Edit button in the top right corner of My Site → Comments to enable the Bulk Edit mode:

Click anywhere on a comment to select it, and then perform actions on all selected comments at once.
Table of Contents
It is possible to turn comments off automatically after a specific number of days. これを行うには、設定 → ディスカッション ページにアクセスし、「X 日以上経過した記事のコメントを自動的に閉じる」のオプションをオン/オフします。

目次
あなたの WordPress.com ブログを不要なコメントから保護する方法はたくさんあります。
- WordPress.com ブログは Akismet コメントスパムフィルターで保護されています。
- あなたのコメントが間違ってスパムとして判定されていませんか。
- コメントを自動的に承認するか、公開前に確認する必要があるかを制御できます。
- 保留としてマークされるコメントを制御するために、コメント管理のルールを追加することができます。
- メール通知を有効にすると、スパムのメッセージを監視し、コメントスパムフィルターを通過したものを見つけたら、すばやく削除できます。
目次
自分がしたコメントを編集または削除する
他の WordPress.com ブログに残したコメントを編集または削除することは不可能です。 ブログのコメントはブログの所有者が完全に管理していますので、ブログの所有者に連絡して、コメントの編集や削除を依頼することができます。 ブログの所有者が連絡先を掲載していない場合は、直接連絡する方法を尋ねる短いコメントを残してみることができます。
目次
ブログの所有者に連絡する。